Counterbores and Countersinks
1. Select Hole from the features toolbar. A box will appear to enter parameters:
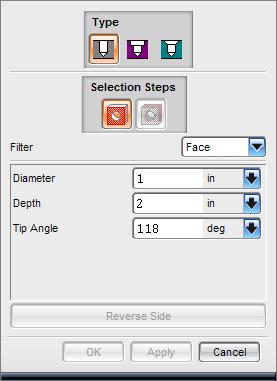
2. Type:
- Simple: Cuts a circular hole to a specified depth.
- Counterbore: Cuts a flat bottom hole to a specified depth (typically used for bolts or cap head screws).
- Countersink: Cuts a tapered bottom hole to a specified depth (typically used for flathead screws).
3. Filter: Allows you to specify whether you want to reference a face or datum plane.
- Face: Select which face to cut by selecting it on the part. A "drill bit" will appear at the spot clicked. No worries, the exact location will be specified later.
- Datum plane: Select which datum plane by selecting it in the display. A "drill bit" will appear at the origin perpendicular to that plane. No worries, the exact location will be specified later.
If you want to create a thru hole, select the opposite face on your part as well.
4. Specify each parameter. Values may be entered manually or they can be generated using the drop box, allowing for:
- Measure: Allows you to set start and end points of the chamfer.
- Formula: Allows you to reference other dimensions within your part.
- Function: Allows you do calculate a distance using a set function and an input number.
- Reference: Allows you to chamfer an edge up to another pre-existing plane.
- Make Constant: Resets Distance box to allow for manual input.
The Reverse Side button points the "drill bit" in the opposite direction.
5. Click Apply once all the parameters are set. A Positioning box will appear:
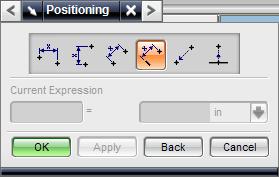
6. Positioning: Use the 6 constraint choices (Horizontal, Vertical, Parallel, Perpendicular, Point onto Point, and Point onto Line) to position the location of the hole. First choose the part feature and then enter the distance.
For example, click the Perpendicular tab (if it isn't already).
- Select an edge (or datum) on the face that is being cut.
- Enter the distance from that edge in the Positioning box. Click Apply.
- Select another edge (or datum) on the face so that the position of the hole is constrained.
- Enter the distance from that edge in the Positioning box.
- Click Apply or Ok to finish and create the counterbore/sink.