SensAble PHANToM Premium 1.0
Overview
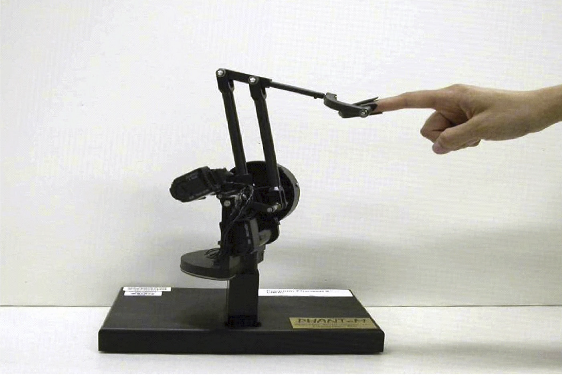
As shown in the photo below, the PHANToM is an impedance-type haptic interface with three actuated rotational joints. Designed to be lightweight, stiff, smooth, and easily backdrivable, this type of haptic interface enables a human user to interact with a virtual environment or control the movement of a remote robot through the movement of their fingertip while simultaneously feeling force feedback. A thimble is attached to the tip of the robot via a passive non-encoded three-axis gimbal to allow the user to move the robot around while freely rotating their fingertip.

As shown in the diagram above, the Phantom haptic device looks similar to the standard RRR articulated manipulator base, but it uses a unique four-bar mechanism to co-locate the shoulder and elbow joints while also keeping the upper arm and forearm in the plane that intersects the axis of the waist joint.
Mechanical Design
Each of the three arm joints (1, 2, and 3) is driven by a Maxon 118743 DC brushed motor with a shaft-mounted HEDM-5500-B02 optical encoder.
Drum and capstan cable drives are used to connect the motors to the respective joints.
The schematic shows Phantom's zero configuration (the configuration where we zero the encoders). Here, the upper arm is horizontal, the lower arm is vertical, and the tip is located above the x-axis. The encoder counts increase when each joint is rotated in the direction indicated on the schematic; these are the positive directions for the joint angles as well.
Matlab Interface
phantomStart(hardware); Call this at the start of your code to initialize the PHANToM driver. Pass in false for hardware when you are developing your code - the software will simulate the presence of a user by playing a pre-recorded movement trajectory. After you are confident your code will have the effect you desire and you're working on the computer in B2 Towne, pass in true for hardware to run your code on the actual PHANToM. Read about the emergency stop button as well!
Encoders = phantomEncoders(); Return the instantaneous encoder values, in counts, with respect to the zero position. Encoders is a 3x1 array of the encoder values. If hardware is set to false, this function will return the next set of encoder values from a pre-recorded trajectory.
Angles = phantomJointAngles(); Return the instantaneous joint angles, in radians, with respect to the zero position. Angles is a 3x1 array of the joint angles. If hardware is set to false, this function will return the next set of joint angles from a pre-recorded trajectory.
phantomJointTorques(tau1, tau2, tau3); Command all three joint torques in newton-meters. A positive torque moves the corresponding joint in the positive direction. Be sure to specify all three values each time you call this function. A warning will be triggered if you request more torque than can be delivered via the maximum current; you can turn off this warning by calling warning('off','PHANToM:JointTorque') on the command line. This function has no effect if hardware is set to false.
phantomCurrents(i1, i2, i3); where (-1.0 ≤ ix ≤ 1.0) - Command all three motor currents in amps. A positive current moves the corresponding joint in the positive direction. Be sure to specify all three values each time you call this function. This function has no effect if hardware is set to false.
phantomStop(); End your code with this function. It closes the PHANToM driver and releases memory back to the Linux Kernel.
phantomZero(); Zero the encoders. If the PHANToM is not calibrated, run "phantomZero" in the command window, and follow the on-screen instructions. This command rarely needs to be run, so it should not be in your actual code. This function does not need to be run when hardware is set to false.
Emergency Stop
The amplifiers in the PHANToM are governed by an emergency stop button. You must pull up the emergency stop to enable motor control, and you can see the state of the switch by looking at the center-top LED on the front of the amplifier box located under the table. You should always run your code with the emergency stop down (no forces) before running it with the emergency stop up (with forces).