Using the Express Milling Wizard and the Prototrak
The express milling wizard helps you with the necessary setup for milling the basic profile of your part. It's also a great way to get started on a more complicated manufacturing sequence. When you are done, move on to customize your milling operation.
Running the Express Milling Wizard
Getting Started: To start the Express Milling wizard, click the manufacturing wizard tab in the left tab bar (the one with the threaded rod and magic wand in it). This will open the CAM Express dialog. Click next to begin.
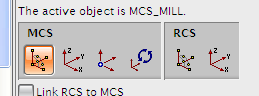
Locate MCS: First you will need to specify the datum that you will use for your machining operations. Use the buttons depicted below to control the MCS (datum) position or simply click next to use the same origin as the model. The MCS buttons work as follows:
- Dynamics: Allows you to drag and rotate the MCS to the desired position. using the green arrows and balls on the screen.
- Constructor: Allows you to construct the position of the MCS relative to features in your model. This is very useful since you will probably use the same feature to establish your datum on the machine.
- Origin: Allows you to specify the origin of the MCS relative to a point in your model.
- Rotate: Allows you to rotate the coordinate system a specified amount along one of its axes
Select the PART Geometry: Next you will specify which elements of the part you will machine. Usually, just click next since you will have an opportunity later to edit this. Otherwise, use "Edit" and "Reselect" to identify the features you want to machine. You can click "Display" to show the outline of the geometry selected.
Select a Blank: Next you will specify the size of the rectangular blank from which the part will be machined. By default, NX creates a blank that perfectly fits the part. For simple operations this may be acceptable, just click next to accept this default. There are a few situations in which you may want to change the blank size by clicking "Edit" or "Reselect"
- Larger Blank: If your stock is larger than your part, you may want to edit the blank to match the stock. This will ensure that all your profiles are handled correctly.
- Thicker Blank: If your stock is thicker than the final part and you want to face it down to the desired thickness in this operation, edit the blank to make it match the thickness of your stock.
- Through Cutting: If you want to ensure that all cuts move completely through the material, you could increase the size of the blank on the bottom to make it larger than your stock. NX should then attempt to machine through this extra space.
Create a tool: In these steps you will specify a simple milling tool for this operation. On the first screen, enter a name for your tool and click next (e.g. MY_TOOL). The next screen refers to the location of the tool in a carrier, just click next since you will be changing tools manually. Finally, enter in the diameter of your tool and click next.
Finishing Up: On the next screen, enter a name for your operation and click next (e.g. MY_ROUGH_MILLING). Select NC_PROGRAM as the operation parent and click next. Specify the depth of each cut you would like NX to make and click next (note, you can change this again later). Click next and finish to exit the wizard.
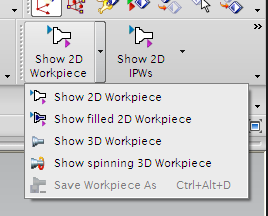
After completing the milling wizard, you will want to see what it has created. Find the "Program Order View" button and click it. Right click your operation (e.g. MY_ROUGH_MILLING) in the left information pane and click "Generate". Wait while NX generates and displays the tool path. Experiment with the view buttons under on the top menu bar displayed below. In particular, "Show 3D Workpiece" gives an excellent perspective on what your part will look like.