General
The MakerBot Replicator 2s are option for students seeking a more hands-on printing experience. These machines will be available during 24/7 to Trained Users Only'. The User will level the bed, change filament, and remove jobs from the print bed as trained. Filament can be checked out for a 24 hour period from the RP staff and come in a wide array of colors. The User is only expected process their part from .X3G files on a SD Card to final print with little assistance. If you would like a more assisted experience, the 5th Generation are a better choice.
Training
In order to use the Replicator 2s, you first need to be certified. In order to do this, please follow the MakerFleet Training Guide to learn about the machines, the software, and the training process. You will be expected to know how to level the build plate, load and unload material from the machine, and start your job. There will be a quiz to check that you have prepared to operate the Replicator 2s.
Filment Check-Out
- Filament can be checked out for a 24 hour period from the RP staff and come in a wide array of colors.
- Late or Over due filament will face a Fee of $100.
- If the spool runs out please notify the RP staff to avoid this fee.
- Filament can be checked out for a 24 hour period from the RP staff and come in a wide array of colors.
Preparation
Create part file and export from CAD as an .STL
- For Soildworks, follow this guide to create the .STL
Start MakerWare.
- MakerWare can be opened on a MEAM computer by accessing Start Menu >> All Programs >> MEAM Software >> MakerBot Folder >> MakerWare 3.6
- MakerWare can be downloaded to your personal MAC or PC from the MakerWare Website.
Import your .STL into MakerWare. 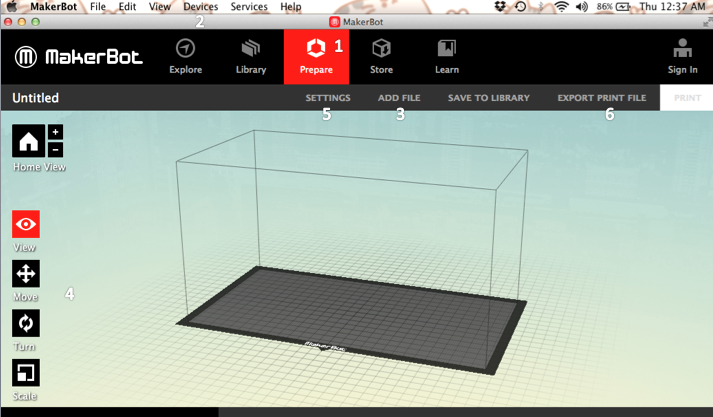
- Click the Prepare button in the LEFT center of the screen.
- Click the Device button in the top RIGHT of the screen.
- Device >> Select Type of Device >> Replicator 2
- Click the Add button in the top RIGHT of the screen.
- If promoted, place on platform and/or convert units.
- Use Move, Turn, and Scale bottoms to place piece.
- Double click on each button for more control options
- On Move panel check that you part is on platform and centered
- On Turn panel, use Lay Flat to ensure your part is lying down
- Click the Settings button in the top RIGHT of the screen.
- Adjust print preference (infill, layer height, support, raft, ect.)
- Click Export Print File and save your file as a .X3g to a flash drive
- Files must be named: PennKey_Course#_filename.X3g (ex. BenFra_101_Top.x3g)
- This file may be reviewed by a supervisor before printing
Printing
Come to supervised hours. You will need to get your part(s) approved and check out materials before printing any part. Come see us according to the hours in the Google calender below!
- note: you may have trouble viewing this calendar in Firefox
- If you are not in the lab at the completion of the print piece will be found in the Parts Bin.